It's been a fairly annoying process, owing mainly to the lack of control we have over our house during the work week. There are various people coming in and out of the house on different days (carpenters, plumbers, electricians, hobos, etc.) and they operate on a fairly early schedule. We are late risers, and thanks to fairly flexible work schedules, we haven't felt truly rushed to start our days in a long time. Keeping in mind we know we are spoiled, and also fortunate to have such an improvement take place at our house, it still kind of sucks - even if it's just for the short term (about six or seven weeks).
*******************
Some backstory and some "before" pictures: the basement of our house has always been an eyesore. One of the primary reasons we purchased this home two years ago was that we really liked the design styles of the previous owners. They opened up the floor plan considerably, and had very good taste/style - which was good because, while we knew what we wanted, we also knew we weren't very good at making it happen ourselves. So the house was fairly move-in ready, as a whole.
The basement, however, was not a focal point for the previous owners. They slapped some beadboard over a few walls, threw a bit of industrial carpet down, and the MLS for the house listed the basement as "semi-finished". (Thankfully the house was otherwise fine and below our price range in our house search, otherwise we would have complained about that aspect of the listing.)
On a good day, the basement looked semi-inhabitable. We used it for beer pong when we have house parties, because it didn't matter to us if crappy beer was spilled on the crappy carpet. On a bad day, like when the pictures below were taken - after we moved everything out of the basement, prior to demolition - it looked like the kind of place where people go when they are abducted in horror movies.

Here's the aforementioned "semi-finished" section of the basement, before demo. The room was lit by one naked light bulb in a $3 fixture, and the wall to the left of the screen would crumble if you punched it - it was just beadboard. Same, really, with the closet wall to the right. The window in the rear came with the house, in 1955 (they were thankfully replaced with new, insulated windows in the demolition).

And here's the unfinished section. The utility sink - made of plastic, and with only three functioning legs - was fed by pipes that were originally covered with asbestos. Yeah, asbestos. Thankfully that is gone now. The washer and dryer are currently in our garage, and April and I have been driving to her parents' house across town to wash clothes the last few weeks. This is only slightly better than the college dorm lifestyle, since her parents don't charge us anything.
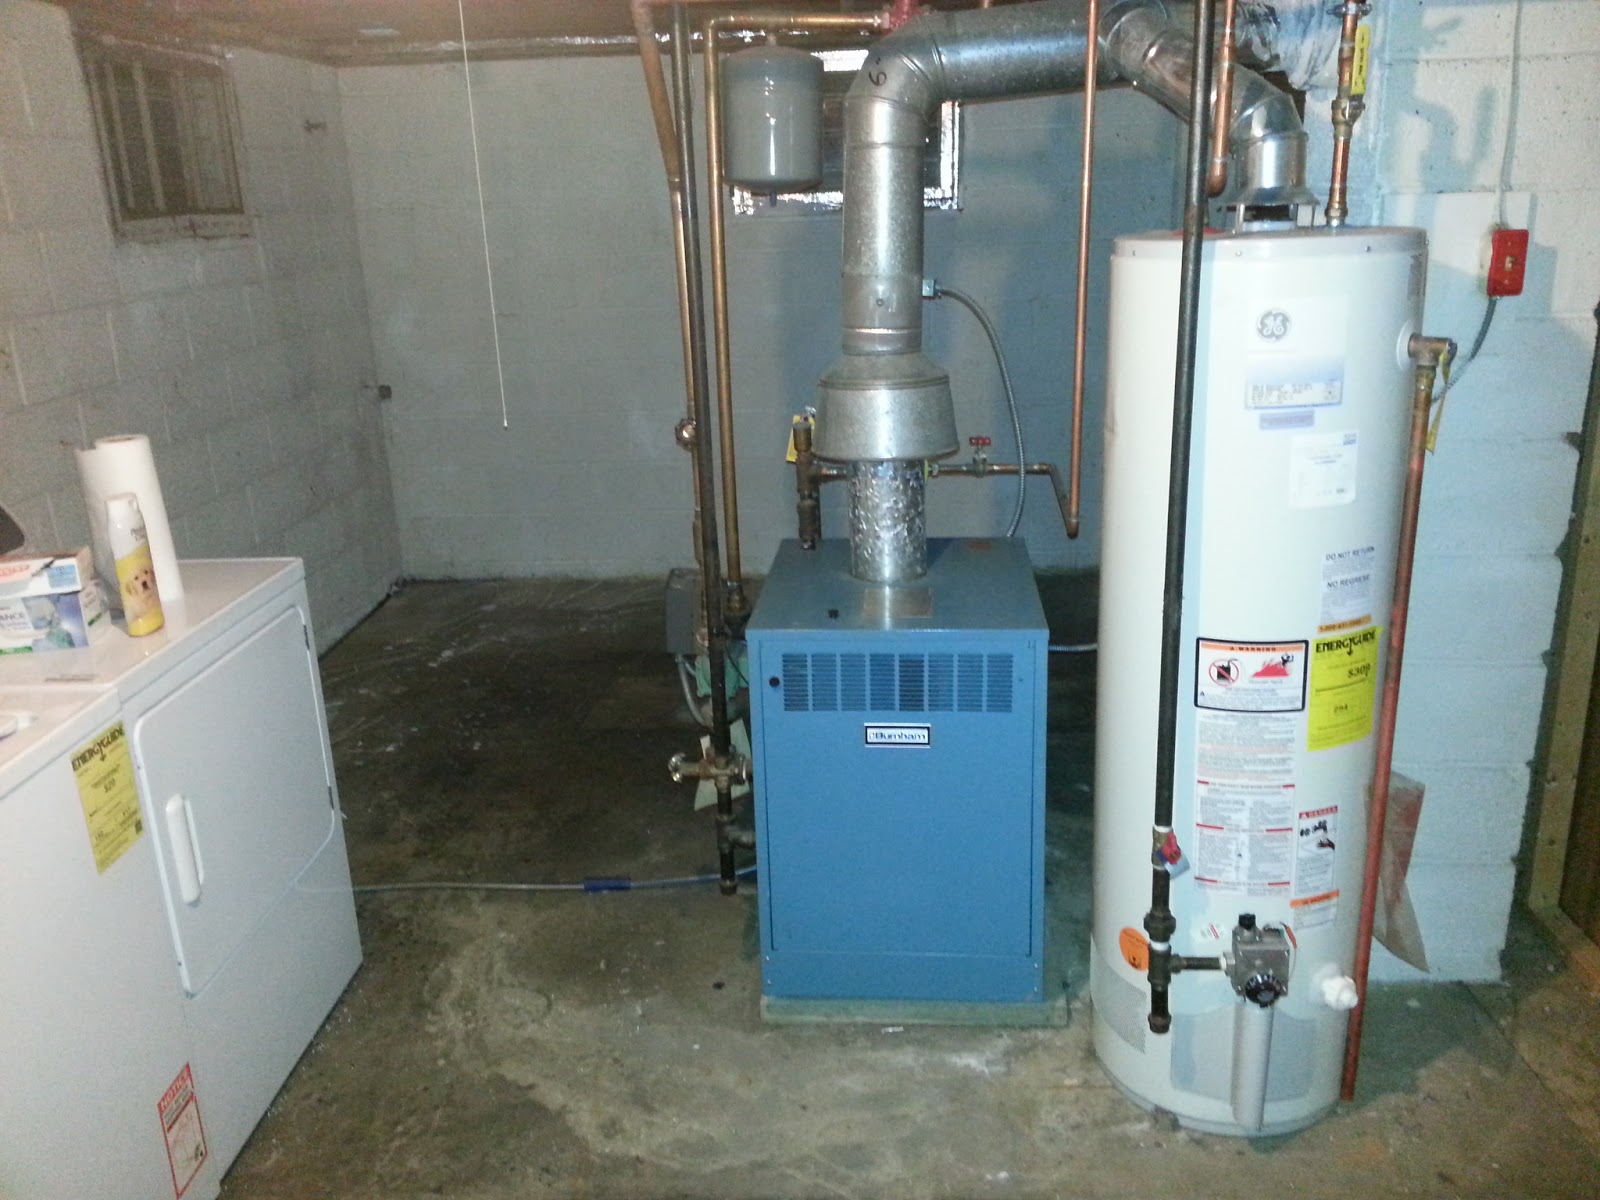
This is clearly the most rape-y part of the basement. Our house is heated by a gas-to-hot water boiler (the blue box on the left). Boilers are a wonderful way to heat your house; baseboard radiators keep the relative humidity of your house relatively high in the winter, compared to furnace hot air heat. Additionally, they require less maintenance and are generally more reliable - the boiler in the picture above was assembled in 1983. Like the author of this post (also assembled in 1983), it occasionally requires some routine maintenance.
Notice that hose on the floor, behind the dryer? That was the previous owners' cheap fix - the hose was attached to a leaky pressure relief pipe. Turned out the expansion tank (that grey cylinder hanging from the pipe) had blown years ago and every time the heat kicked on, the pressure inside the boiler increased to 60 psi (it should be less than 20 for safe operation). When the demo guys removed the hose, the pipe started leaking dirty water all over the concrete floor. Replacing the expansion tank was an additional, unexpected cost about $200 - one of those extra monetary hits you should always plan on when budgeting a home improvement project, because they always happen. Bottom line, replacing the tank was cheaper than replacing the boiler (though that will eventually have to happen, too).
******************************
Below are the more recent pictures, after three weeks of work in the basement:
- Week 1: Demolition/boiler fixing
- Week 2: Framing
- Week 3: Rough plumbing/electric
You can see that though the basement remains very much a work in progress, it also looks much different than before. Here's the first picture:

The crappy window has been replaced, and wood studs jut out from the walls. There's also a grid dropping down from the ceiling (after sheetrock, the ceiling is approximately 6'9", just high enough to not give me claustrophobia), and the lights will be recessed in those metal jackets you see above. To the right is a closet, which will remain unfinished (but hidden from view using doors). Our plan for this room is a media room; there will be a couch and possibly a recliner on the back wall that you see here, with a wall-mounted TV on the opposite wall.

Above is the space behind the boiler and hot water tank; this will eventually become the second full bathroom in the house. You can see the hot (red) and cold (blue) water distribution lines, as well as the drain pipe (that's the larger, PVC pipe). To the right is our new, space-age ejector system. It turns out you have two choices when it comes to the removal of water/waste from a basement; you can either use gravity (which in this case would require drilling into the concrete foundation, a logistical nightmare that would also be extremely expensive) or you can use an above-ground ejector. That white box (known, in technical parlance, as a macerating, upflushing sewage system) does all of the literally dirty work involved in pushing refuse from a toilet, sink, and shower to the house's standard sewage pipe.

And finally, this is the new laundry room - the white box is where hot/cold water will enter the washing machine. There's a horizontal pipe below, which will lead from the utility sink (not pictured, to the left) to the washing machine and to the house's main sewer pipe (that big pipe to the right).
*************************
It surprises me that, with all of the extra stuff in our basement in terms of framing, plumbing, electrical, and (now) insulation and sheetrock, the room looks bigger now than it did before. Our basement is not a huge space; it's maybe 450-500 square feet of livable space, once the project is finished. But when you're downstairs, it looks much bigger than it is. I cannot wait to sit down in a finished basement, prop my legs up in a reclining chair, and watch a baseball game this spring.
What's next?
- Week 4 (this week): Sheetrocking
- Week 5: Sheetrock (finish)/Trim (start)
- Week 6: Trim (finish)